1947 House
1275 Square Feet
4 Bedrooms, 1.5 Bathrooms
Laundry Room, Dining Room
4-Car Garage (It was a start)
No Wheels, But You Gotta
Work on the
House Sometimes
|
|
1947 House No Wheels, But You Gotta |
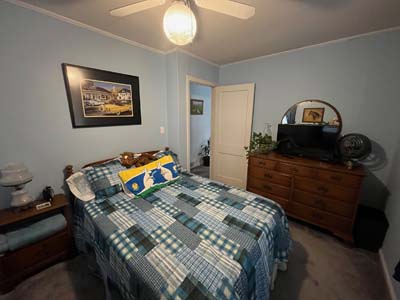
| April 29, 2025 - With the living room done, I decided to attack the long-neglected front guest room. The left front corner had been damaged by an old leak (long fixed), so I got that fixed first. With the plaster fixed (mostly), I painted the room a light blue, and got a new bedspread. It took a lot longer than expected, of course, but the room is nice-looking now. |
 |
|
|
|
|
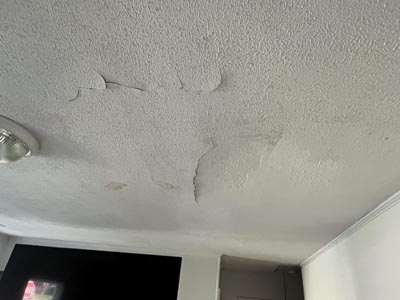
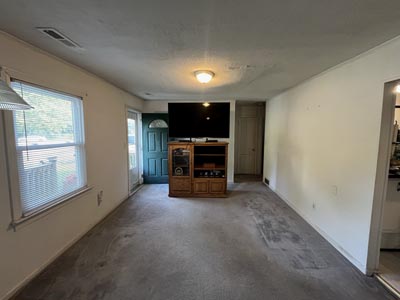
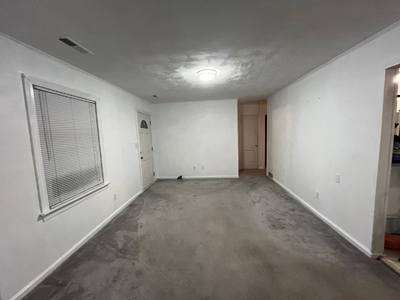
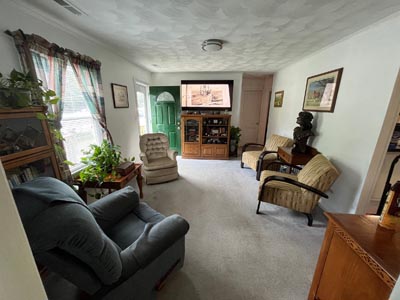
March 22, 2025 - I just finished a month-long replacement of the living room ceiling. Happily, the repairs were completed by the insurance company. It all started with a wet spot on the living room carpet. I looked up and saw a lot of cracks in the ceiling. Turned out the A/C drip pan had a drain pipe that had clogged. I called my insurance company, and they were out the next day (Thursday) to inspect the damage with a contractor. The following day, a team arrived to remove the ceiling - lucky I had spent Thursday afternoon and evening moving everything out of the living room and into the office, dining room, and spare bedroom. After that, it took three weeks to get the new ceiling up, After which I had to repair some damage caused by the contractor and repainted the walls and the front door both to finish the fix and because the room was empty. The light fixture also had to be replaced as the light box was suddenly too low. I got everything moved back today and am very pleased with the final result. |
|
|
|
|
|
|
|
|
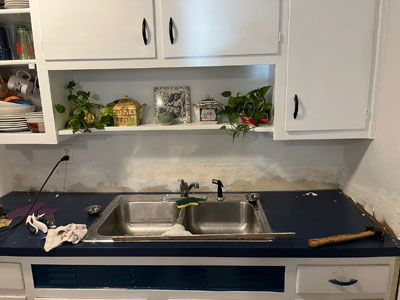
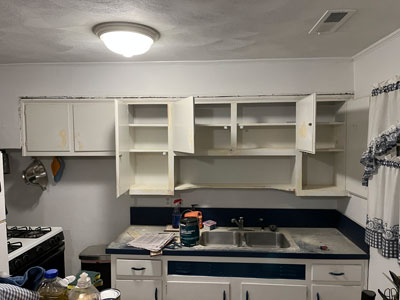
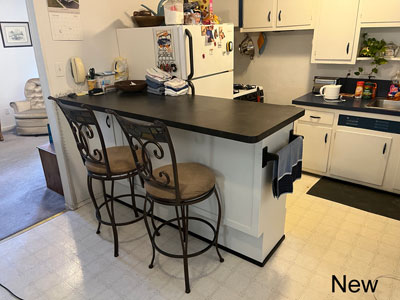
October 22, 2022 - The kitchen was redone after I bought the house in 1992, and after 30 years it needed a refresh. So I took a deep breath and started pulling it all apart. This meant ordering new countertops, getting a sink and faucet, and even new chairs for the breakfast bar. I chose a black marble-patterned Formica to replace the original solid blue, picked out a much deeper stainless sink and a new faucet, and painted everything. Not a huge difference, but it freshened the room up a lot. I had to redo to wall behind the sink splashboard because I had stupidly glued the blue one in place and it tore the plasterboard when I pulled it free. The door and drawer handles were bead-blasted and repainted semi-gloss black. The deeper sink is great, and the sprayer had quit working on the old faucet years ago and I was amazed how nice it was to have it back. |
|
|
|
|
|
|
|
|
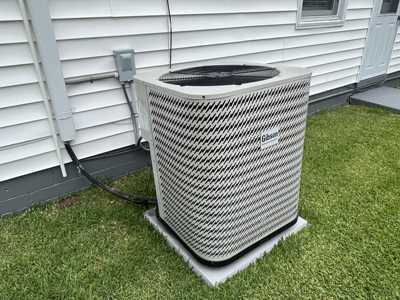
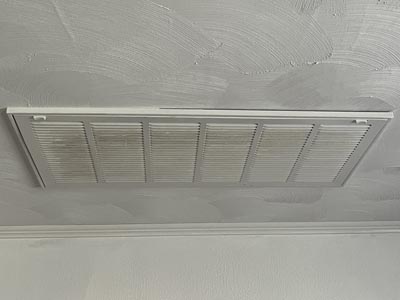
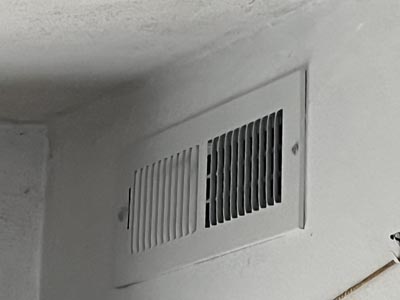
October 18, 2016 - Ron Subeh and AT Mechanical finished up a huge change at the house today - central air and heat! This was a big job for the contractor and took a lot of work by me to get things ready. First of all, the electrical system of the house still had a glass fuse 30-amp box that wouldn't work for central air. That got upgraded to 100-amp circuit-breaker service. Next came a new roof, which was about 28 years old. New windows were next, which vastly improved the insulation and lowered noise. My old oil heater that I had been maintaining for years finally gave up the ghost, and the last two winters I had made so with portable electric heaters. This year everything was ready, and Ron and his crew went to work. The house required full ducting, and I had figured there was nothing that could be done for the back bedroom, which had been added and had no space for a duct. They solved the issue with a corner duct that comes out the top of the wall in the back room. The heat exchanger is a Gibson 2.5 ton unit that was rated for a larger house, but Ron used the bigger unit so it wouldn't have to work as hard. (OK - this is a cheat - I realized I hadn't posted anything about the central air when it was done. The photos were taken almost 9 years after the system was installed. And it has been fantastic. There was one small glitch with a circuit board when i first used the heat two months after the install, and Ron guessed which part was bad and had the part place leave it behind a bush so he could fix the system the same day. On a Friday night!) |
|
|
|
|
|
|
|
|
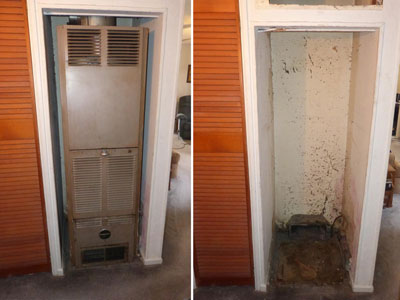
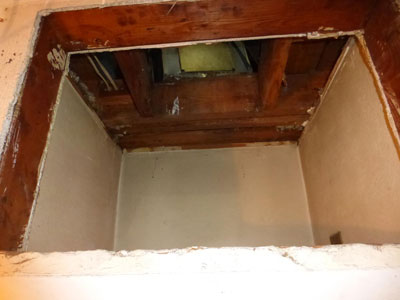
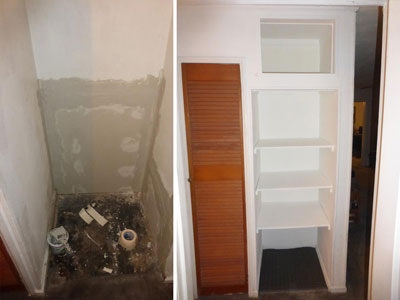
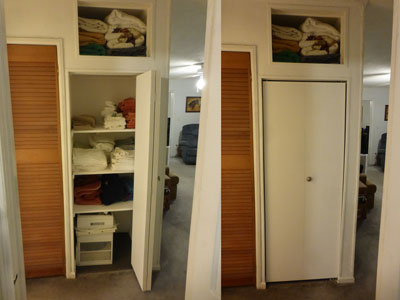
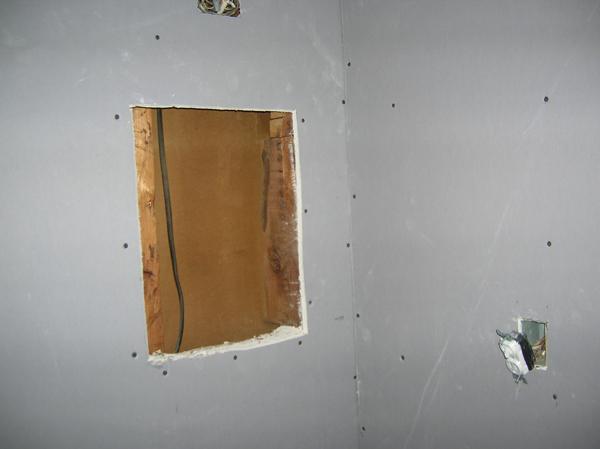
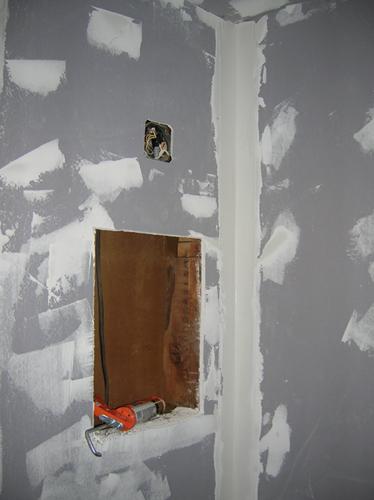
January 9, 2016 - The fifty-plus year-old oil furnace (top left) gave up the ghost three years ago and I switched to electric heat. However, the furnace sat in its cubby directly across from my bedroom door until just a few weeks ago. I decided I was tired of looking at the old monstrosity, and would really like some additional closet space. So out went the furnace, leaving a 6' x 29" x 28" space with a framed out opening above (top right) for access to the chimney stack (plus half-century-old dust bunnies!). I pulled the heat exchanger out of the ceiling, and had to put in a new ceiling and wallboard. I ended up trimming out the upper access to create an open blanket and bedspread storage bin and then fitting solid 3/4" shelves. Everything was trimmed out with mitered crown molding and corner moldings, and it turned out pretty decent. Plus, the new closet is twice the size of the old one. The last step was to paint and install the custom-ordered bi-fold door. I am very pleased with the results. Not perfect, but for a total cost of about $300 it is a big improvement to both looks and function of the house. |
|
|
|
|
|
|
|
|
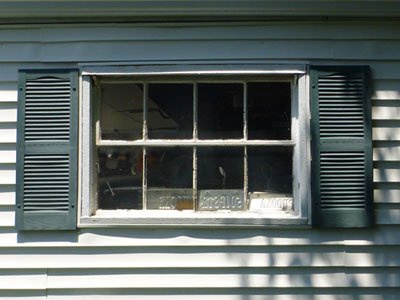
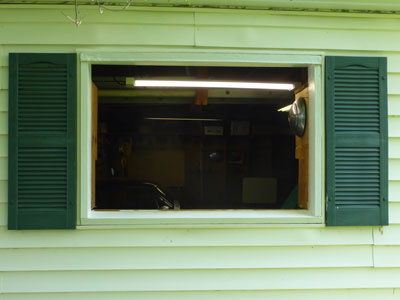
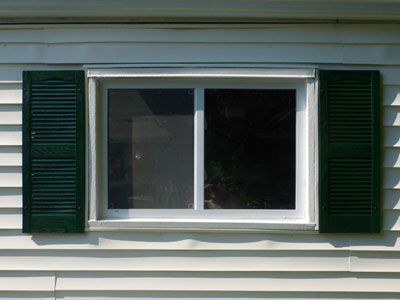
June 14, 2015 - The garage windows came in Friday, and I got back from Jamaica (business trip) Saturday at 1 AM, so I spent much of the weekend installing them. The first one went in fairly tight and clean, but the second required making a 1" wood shim - the outer frame was off that much! Even so, the job turned out very well, and I also painted the shutters to match the house. I am pretty much done with the main projects. Now I need to spend the next month cleaning the garage! |
|
|
|
|
|
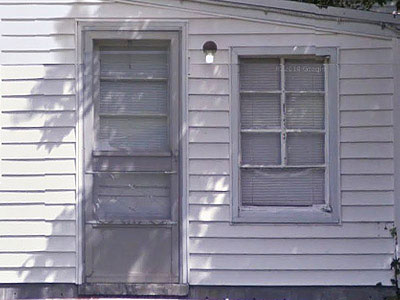
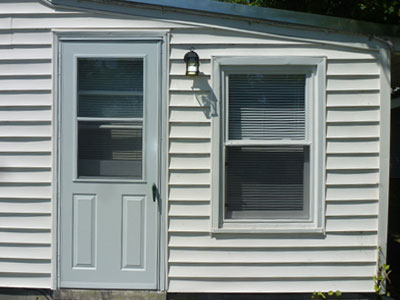
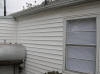
May 22, 2015 - More house projects are moving to the 'DONE' list. I took today off and installed a new storm door on the side entrance that is actually blocked by the bed in the back bedroom. The door there has not been opened since I bought the house in 1992, and the outside paint showed the wear of decades of direct sun. Someone broke the top glass in the storm door, and I decided to replace the whole assembly with one that blended better with the house and that would also help cut down outside noise. I got a solid core aluminum-clad door that was heavy, but much more effective as a sound deadener. Installation was a bit awkward with the main door closed, but I managed with some careful measurements. More importantly, I actually read the directions before I started and followed them - mostly - I am a guy, after all. It came out great, opening and shutting smoothly and latching well. The door was only $159, and looks to be very good quality. I probably didn't save all that much - maybe $200 - installing it myself. However, I don't think a professional would have done it any better, and I took the opportunity to paint the handle green. I also installed the nice exterior carriage lamp style light that I've had to replace the rusty old jelly jar fixture - it's been sitting in the laundry room for years. Next weekend I have another even bigger project planned. new windows for the garage! |
|
|
|
|
|
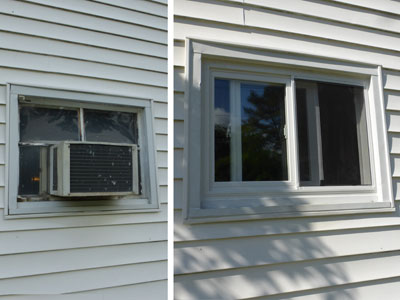
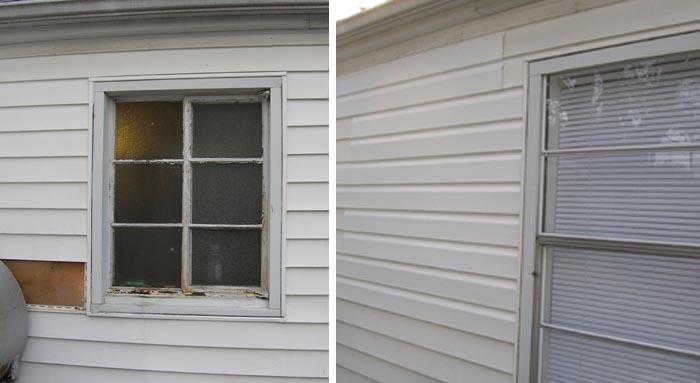
May 9, 2015 - After 23 years in the house, and more than seven years since my last bout of house work, I finally abandoned the garage and driveway full of cars for some big home improvement projects. The first was the roof, which was removed and replaced with architectural lifetime warranty shingles. Next came new gutters on the house and garage, all of which had come down two years ago in winter storms. And finally, all new windows to replace the terrible mix of rusty metal casement windows, crumbling wooden replacement windows, and hodgepodge conglomerations like the built-in, non-working air conditioner in my office. I had all the big work done by contractors, but painted trim, redid the shutters, and installed all new blinds and some new curtains. The ones that got reused were washed and actually ironed! I still want to replace a side storm door to rear bedroom, and have a few minor projects to work out, but all the big stuff is done for now. |
|
|
February 15, 2015 - It took more than a year, but I got the garage door opener moved and working well today. Silly to have waited so long. I got home from work, cut the two 2x4 supports, shifted the mountings, and got the opener unit moved and wired in less than two hours total. I had to go out and buy new batteries for all the remotes - but they all work great. |
|
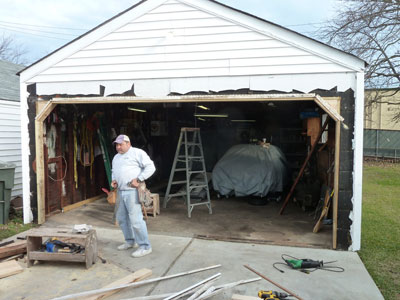
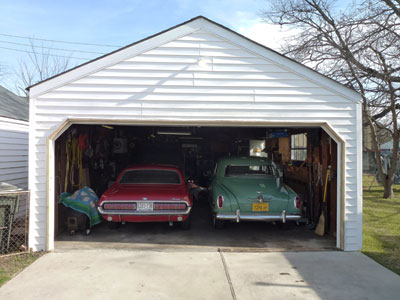
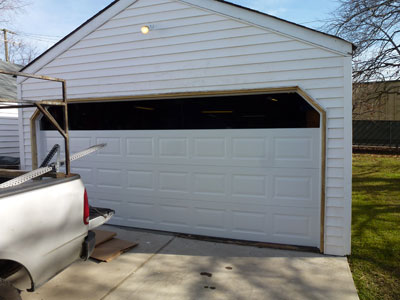
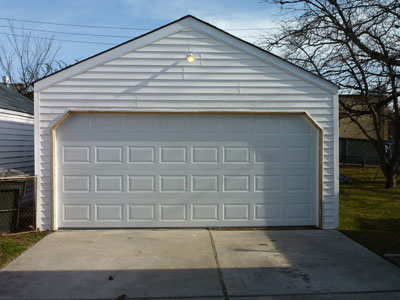
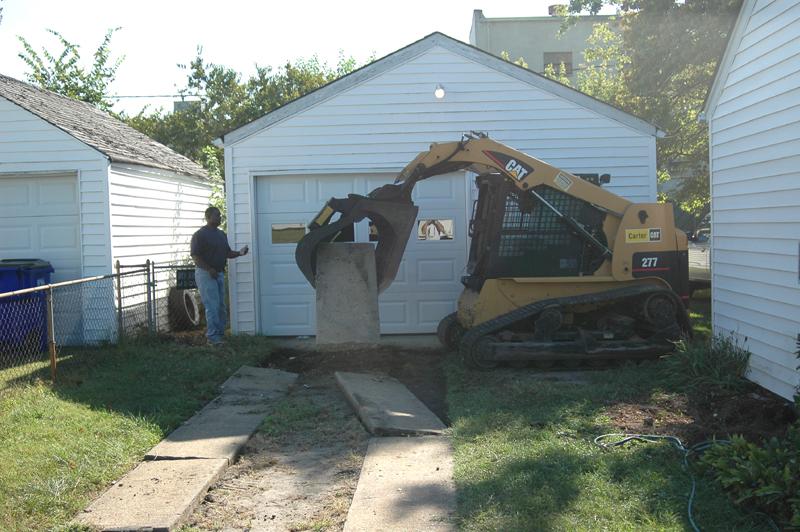
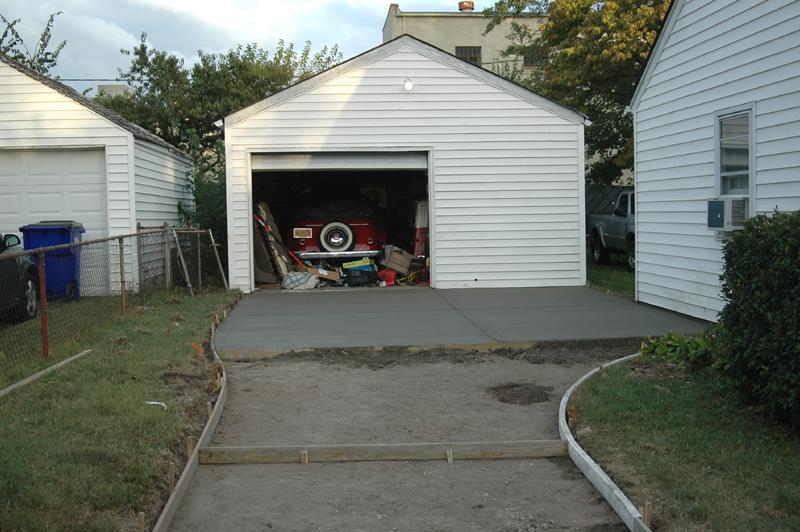
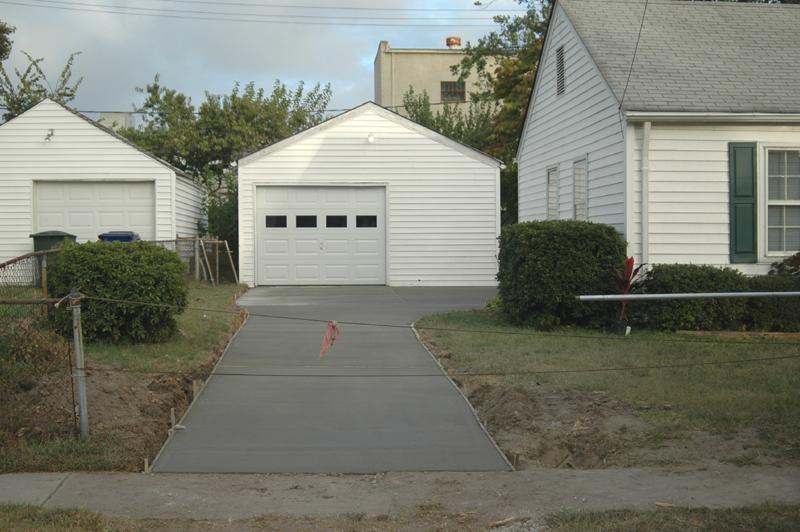
December 31, 2013 - My garage is the reason I bought the house - essentially a 4-car affair, though I use the back right corner for a work area (and excessive junk storage). However, the 8-foot door in front limited the use of the front right corner. I had to drive a car in at an angle, jack up the back and put the wheels on skates, and push it into the corner. So after more than 21 years, I finally decided it was time to open things up. I also, very wisely, decided that although I had installed the replacement 8-foot garage door some years ago, I would have professionals handle the enlargement. The first stage was the opening itself, done yesterday. The contractor used two 20-foot boards to bridge the new opening, making the frame strong enough to joist engines from. He also angled the corners to add a touch of style. Everything is pressure-treated wood. There was plenty of siding to piece in the sides. Today, Virginia Door installed the insulated door. Although it is twice the size, a powerful counterbalance spring makes the 16-foot door open with less effort than the old 8-foot version. It looks great and the Studebaker is finally back in the main garage, instead of the carport. |
|
|
|
|
|
|
|
|
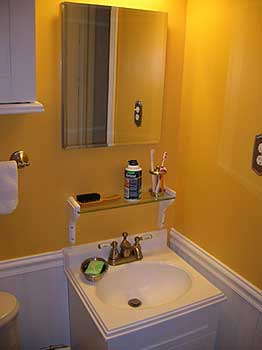
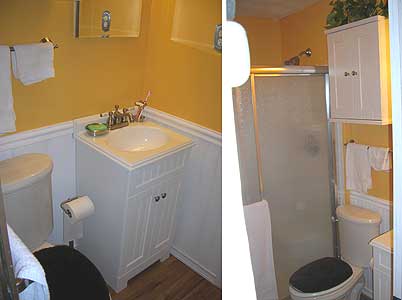
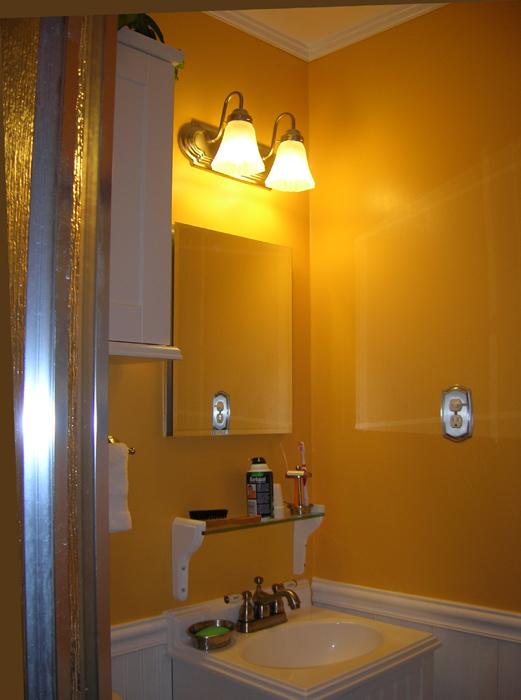
January 27, 2008 - At long last the crown molding is up and painted! That is the last detail to finish up the bathroom, and also the string of house projects I started back in October. It looks a good bit homier now - I have a favorite picture up and enough of my 'stuff' set out that it's losing the sterile look. Maybe now I can get back to working on the cars! |
|
|
|
January 14, 2008 - I had some busy weekends - my sister showed up with her youngest offspring the day after I finished the bathroom and stayed a few days. Then I went out of town over New Year's. I decided to take a break from the mad rush and haven't done anything in the bathroom for a while. I did some caulking which needed to be finished up this past weekend, and tonight I got a glass shelf installed between the sink and medicine cabinet. It is actually left over from the old bathroom, but I liked it and there was a lot of dead space over the sink. The bathroom still looks a bit sterile - the shelf helped, but i want to put up a good picture or something. The planned wallpaper border is pretty busy - I may leave that off. Still have the crown molding to do - maybe this weekend. |
|
|
|
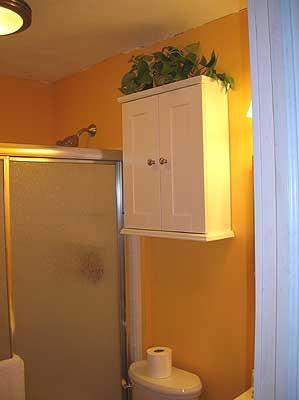
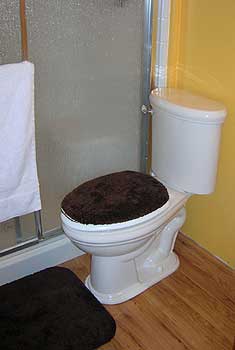
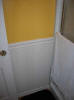
December 20, 2007 - It's amazing how much difference little stuff makes. I got the towel rack up, picked up matching sink and toilet accessories in the brushed nickel, plus a toilet paper stand which looks nice and is rather convenient. Also, I got the last section of wainscoting cut, painted and installed. That's all I am doing for now - there is still the crown molding around the ceiling, and I need to finish off the top edges around the shower, but that can wait for a week or so. I haven't decided if I'll use the Gasoline Station Sign trim strip I ordered or not - I'll probably wait until the crown molding is up and see how it looks. Still, for all intents and purposes, IT'S DONE!!! |
|
December 19, 2007 - I had more adventures in plumbing tonight - first off, the drain set I bought was the wrong size, so I had to run back to the hardware store for the correct one. When I finally got everything connected, I turned on the water and presto! Instant leak. Drat. The old cold water shutoff valve was leaking pretty bad, so I shut the water off and pulled out the one I bought to replace it. Wrong size, and the hardware stores were closed. Happily, the old hot water valve was pulled because of a cracked elbow joint, and I hadn't thrown it out. Once I got that one in, the sink worked fine. I'll go ahead and replace the valve later anyway, but I can use the bathroom again! And yes, the hot water comes on with the hot water valve. I also got the wall cabinet installed - that will provide a lot of storage space for toilet paper and other supplies, and free up some of the linen closet. I still have one section of wainscoting to install, then the towel racks and crown molding and other bits and pieces. That will get done over the next few weeks, more at my leisure. I moved all my stuff back into the bathroom and can start using it as the master bath again tomorrow morning. |
|
|
|
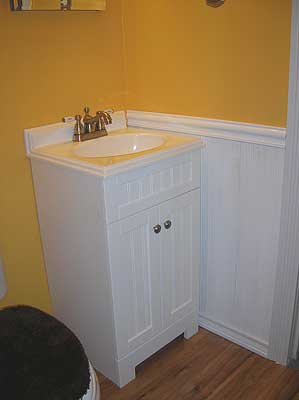
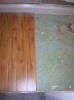
December 18, 2007 - Lowe's had the sink back in stock tonight, which saved me a long drive out to the Chesapeake store. It's sorta funny - I originally picked out this cabinet sink when I was scouting out possibilities before I started the work. Then I started looking at different options almost every time I went to a store, jumping around to different styles. However, in the end, this was the only one that fit the space and the design. I got the wainscoting up and painted, installed the door trim and new lockset, and assembled the sink and faucet. I still have to attach the cabinet to the wall and hook up the hoses and the drain. And the wall cabinet needs to be installed as well - I have to pick up some long screws for that. It's looking like a complete bathroom, though! |
|
December 17, 2007 - The throne room is now equipped with a throne. And I am pleased to report a royal flush of success. OK, it wasn't quite as straightforward as I thought it might be. The wax seal that came with the toilet wasn't big enough to fill the gap thanks to my added flooring. So it was back to the hardware store to pick up a larger seal, plus the water connection hose. I discovered they had a new type of hose that shuts off the water automatically in case of a break - just a few dollars more, so I got one. However, once I got the toilet in place and everything hooked up, the water ran only for a few seconds before shutting off. Turns out it sense water flow, and shuts off when I open the valve all the way. So I had to leave the valve only part open - makes for a slower fill, but I don't expect marathon flushing events. And yes, it's been tested. So far, no leaks and it only uses 1.6 gallons per flush versus the huge old 3+ gallon tank I had on the old toilet. having it in place also answered some questions - I really have to go back to the original plan of the 20-inch cabinet sink. A couple of 24" options had looked promising, but there just aren't 6 more inches to spare. I hope to get the cabinet and sink in place tomorrow night. That will get all the major stuff done. |
|
|
December 16, 2007 - The medicine cabinet and wall light fixture got installed Friday night, and looked great. Greg, the second handyman, showed up to redo the exterior siding that the first guy mismatched and pieced in. He replaced the whole run instead of doing piecework, which look 100 percent better. Not to mention using the correct siding. I painted the ceiling and door, and touched up paint yesterday, and attacked the floor today. That had its own sidetracks - I needed a table saw, so I went out and bought one and put it together. I did a good cleaning and vacuuming of the bathroom to get all the dust and debris out, then scrubbed the old turquoise linoleum one last time. I was very careful cutting and measuring, and got the whole floor laid without any messed up pieces. The next step is installing the wainscoting and then the toilet. I'm really pleased with the way the floor came out - the wood looks really nice. NOTE - Got home tonight in time to put up one wall of wainscoting - also tried a new gallery layout - you can click on the photos instead of having to keep clicking back and forth! |
|

|
|
|
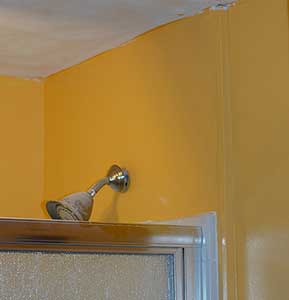
December 14, 2007 - I got the spots touched up on Wednesday night, and tackled the corner where the shower side wall meets the bathroom wall last night. It jutted out an inch, and thanks to sloppy work on the part of the first contractor required shims on the front and side to be reasonably level. I found a corner trim strip for drywall which worked out pretty well, and got it up last night. The wallpaper strip came in the mail yesterday, and I also got the paint mixed for the color coat. Tonight I did the color coat - the ceiling will be white, along with the lower wainscoting, cabinets, and the shower and toilet, so I could get pretty vibrant with color. I have some other trim work to do, but once the ceiling is painted I feel safe installing the floor and wainscoting. May be longer than this weekend, but not much before it's all done! |
|
December 11, 2007 - Got the first primer coat on - really brightens the room a lot. I was happy with the mud work - only a few spots had to be touched up. I'll give the walls a second coat of primer tomorrow night or Thursday, and if I get the wallpaper strip to match up, I'll try to paint color coats Friday night. That leaves putting in the floor and wainscoting Saturday, and the toilet and ink on Sunday. Maybe. |
|
|
December 10, 2007 - Cough. Gasp. Wheeze. Got the joints and spots sanded down tonight - what a dusty, nasty mess that made! Also bought primer to do a base coat on the walls, and found the toilet I want to get. Narrow tank, high seat, and old-fashioned look. I ordered an Old Gas Station Sign wallpaper border and am looking at a yellow-beige or tan color for the walls, with a white ceiling and trim. Getting the walls finished up is taking longer than expected, but I still think I might be able to finish up by the end of this weekend. |
|
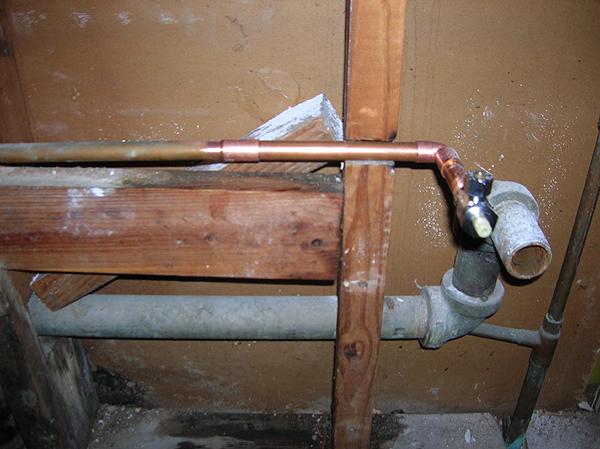
December 8, 2007 - The handyman showed up right at 8 am, and got busy. I took the last load of debris from last weekend to the dump while he cut wallboard, but when I got back he showed me a problem. The hot water feed line for the sink was leaking at a soldered elbow - probably due to pulling and banging during the demolition work. I went over to the hardware store to get everything I needed to replace the leaky setup, and found something new - a copper bonding liquid for solderless joints! It was guaranteed to work and the Hardware store guy said he'd had no issues with it. I got the materials to solder just in case, but by golly, that solderless stuff worked great! With the plumbing fixed, the last wallboard went up and was taped off. That finished the handman's part of the work. I had some activities today, but managed to get the mudding done before and after. I'll have to sand and refill the low spots tomorrow, but the walls are up and I'm about ready to lay the floor! |
|||||||||||||||
|
|||||||||||||||
|
December 6, 2007 - Had another handyman come over to help with the wallboard installation tonight - in two hours, he had all the framing done and one wall finished! His workmanship is clearly better, and I am very happy to stand back and watch a professional work. He'll be back early Saturday to finish up the wallboard and tape. After that, I can do the floor and wainscoting, and then get the rest of the fixtures in. Progress! |
|
|
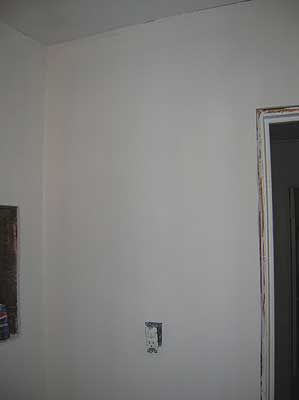
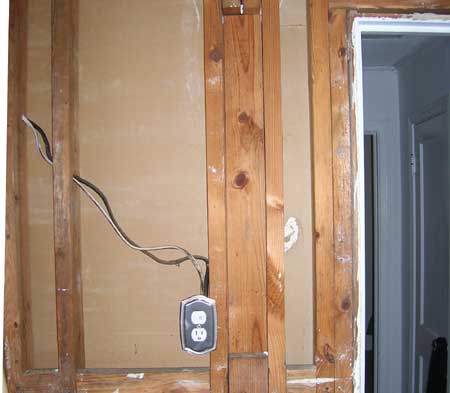
December 5, 2007 - The wall with the entry door had to have the trim pulled off before the wallboard could come down. After that, I stripped it down to the studs and got everything cleaned up. That left relocating the outlet - in the old bathroom the only outlet was built into the light fixture. It was a reach even for me to use it. So I relocated the outlet to the wall box with the light switch. I ran a separate lead using commercial copper cable, and with some work, was able to route it through the studs using the original wiring passages. Both the switch and outlet work fine, and once again I emerged unshocked. |
|
|
|
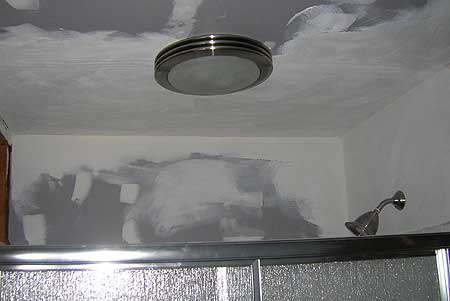
December 4, 2007 - I have needed a vent fan in the bathroom for ages, but never got around to putting one in. I'd already bought an inexpensive white plastic fan assembly, but didn't like the look of it. So I went back and decided to splurge a bit on something nicer - this is a brushed stainless fan/light combo with marbleized glass that adds a lot of light and looks good. I wired it into the existing switch for now, but will be re-wiring a new outlet and double switch into the circuit when I take out the last wallboard by the door. |
|
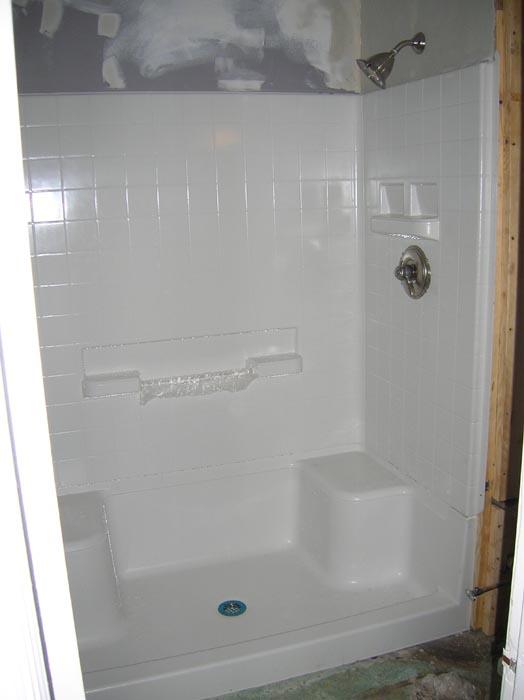
December 3, 2007 - I got busy after work and pulled the new shower door assembly out of the box. happily, I read the instructions carefully before starting anything. After careful measuring and double-checking, I got the pieces installed straight and level, but the outer door wouldn't slide smoothly. Turns out the bottom retainer channel had gotten pinched slightly, and after straightening it out, everything worked great. Tomorrow night I'll try to get the new ceiling light/fan installed. After some consideration, I cancelled the work order with Chris to finish out the work. The taping on the ceiling shows through the plaster, what little shower framing he did was crooked, he used mismatched siding to finish off the outside of the filled in window, and left all the construction debris for me to clean up. In short, I could have done better myself, and believe me, that is no great shakes. In fairness, he had said he'd replace the siding later, and was going to put a second coat on the tape. Still, I don't feel comfortable with him working on the house any more, so I'll either get someone else or finish it myself. |
|
|
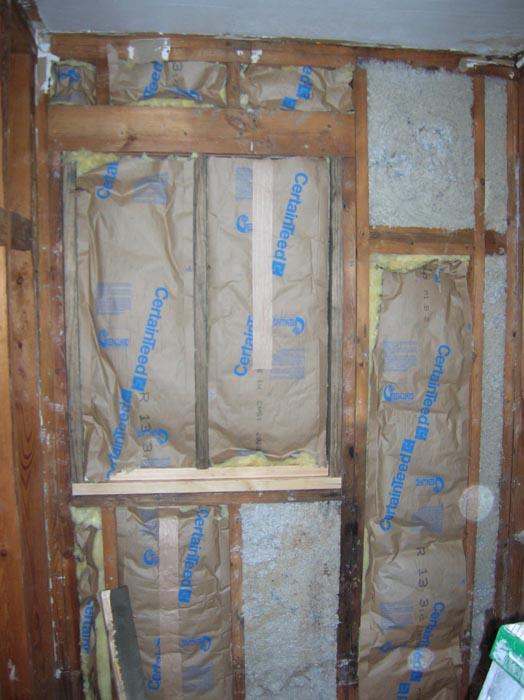
December 2, 2007 - It's been a long weekend, and as expected with a 60 year-old house, things didn't quite go as planned. One of my main fears was unfounded - after 60 years with bad walls and caulking, I was afraid we'd find a lot of rotten wood. Nope - all clean and solid, even right around the tub! They had to sledgehammer the old cast-iron tub apart, but that went OK as well. Then they cut out the old casement window (rusty and drafty). Chris (the contractor) framed in the hole and insulated it all before they installed the shower. The first big issue was the drainpipe - turns out it was rotted out so bad you could poke your finger through it along the entire bottom. If the rot extended into the central drainage collector, most of the bathroom slab and the entire drain setup would have had to be redone. I'd have been looking at at least another $2,000 and probably a week without a shower. Happily, the plumber was able to clear the old drain pipe with only minimal breakup of the slab, and the central drain was OK. Whew! On the plus side, the slab has been open around the drain for the past 60 years, allowing insects and other critters an easy way in - it's all sealed up now with new concrete. The drain work slowed things down, but they were almost done last night when two issues popped up. The plumber screwed up when he cut the hole for the regulator - by about 3 inches! Dumb mistake, but I've been known to do something like that before. The plan was to completely redo the placement of the regulator to fit the hole - however, before he did that, it was discovered that the wall section had a malformed top interlock peg and wouldn't go in! So I was able to get a new panel free from Lowe's which dropped right into place, and has the hole cut in the right spot. They all came back this morning and made quick work out of finishing the shower, and Chris put up a new ceiling. I cut the holes out for a nice ceiling light/fan combo and will install that later, and also picked up the glass shower door made for shower - it has sides beveled to fit the specific base. Installation should be pretty easy - another project for later this week. I have to wire the outlet and ceiling unit, and install the vent pipe as well. Chris will be back in two weeks (sooner if he can) to finish installing all new wallboard. Once that is done, I'll put in the floor and wainscoting, install the new toilet, and then see which size cabinet I can fit into the room best. Everything is a stock item, so I can do the job piecemeal. The end product is still a few weeks away, but I can shower! (My coworkers will be really happy tomorrow!) |
||||||||||||||||||
|
||||||||||||||||||
|
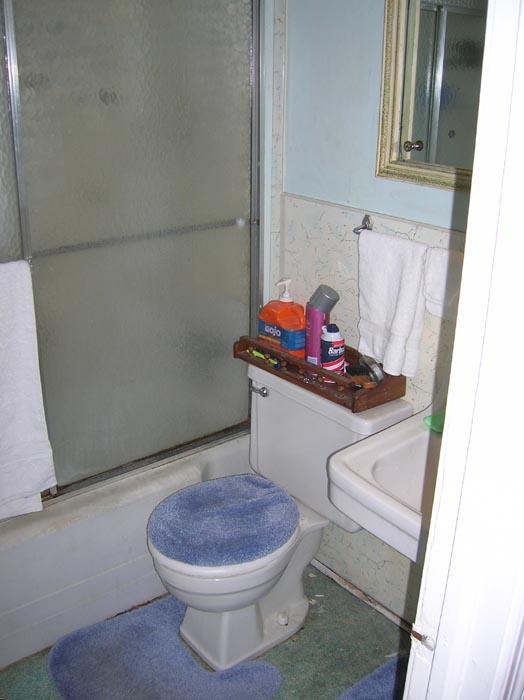
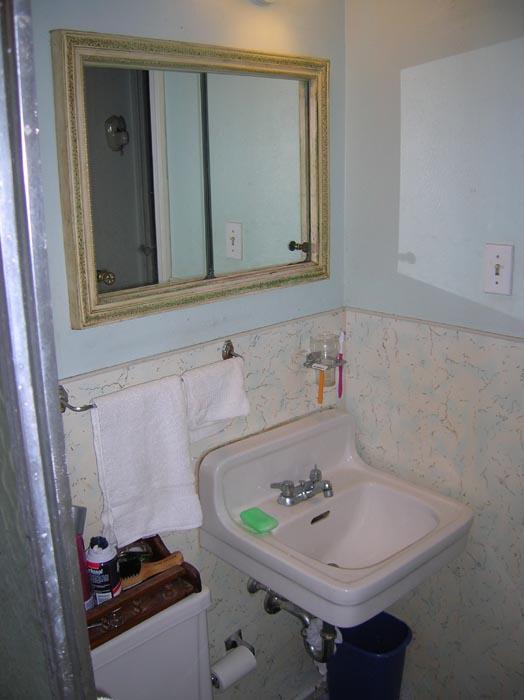
November 30, 2007 - Presto-Chango! With a few turns of a monkey wrench and some careful siphoning, both the toilet and the sink came out without a fuss. I also removed the old medicine cabinet - I'll have to put in a support when I close in the hole for a single-width cabinet to replace it. You'd think that with most of the fixtures gone the bathroom would look bigger. Nope - looks positively tiny now. It really points out the differences in priorities in 1947 and now. I've seen walk-in closets triple the size of my bathroom, and bathrooms triple the size of my living room. I think they were smarter in 1947 - how much of your life do you really want to spend sitting on a toilet or cleaning up? The contractors will be here in the morning to take out the tub and hopefully get the new shower in. Fingers crossed! |
|
|
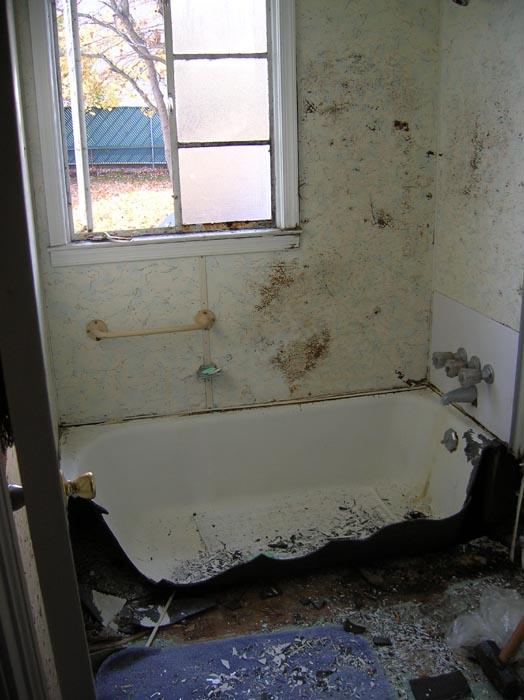
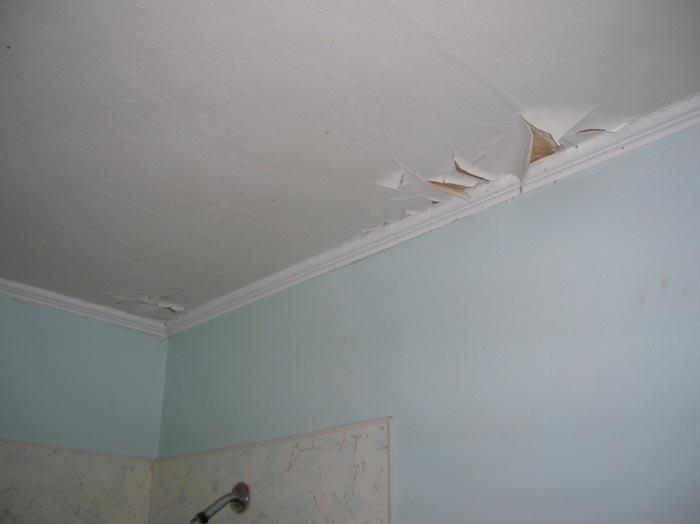
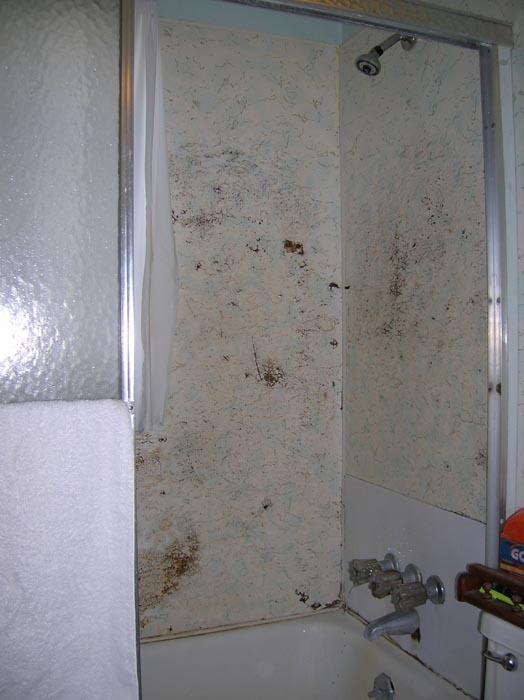
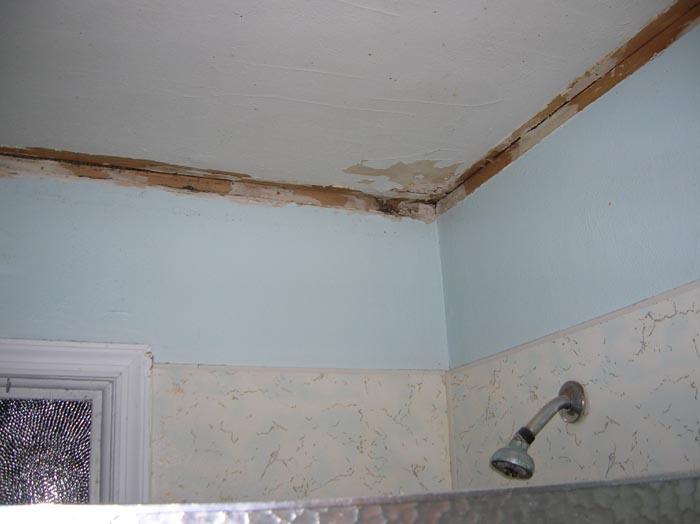
November 29, 2007 - The bathroom gets ripped out this weekend. I took some before shots to show just how awful the room was (That's not mold on the tub walls - the fiberboard surround is breaking down). I got a start last night taking out the crown molding and removing the biggest section of fiberboard from a wall. The fiberboard is glued on, and took the facing off the wallboard. With 60 years of paint cracking on the upper walls and old holes from long-gone towel racks and shelves, I think I am going to go ahead and have all the wallboard redone. The contractor can install the new shower so I have a place to clean up, and do the wallboard later. In the meantime, I'll pull the toilet and sink tomorrow night in preparation for them coming in Saturday. The job keeps getting bigger - still, I'll be really glad when it is all done. |
||||||||||||||||||||||||||||
|
||||||||||||||||||||||||||||
|
|
November 24, 2007 - Work has been wildly busy, so it took until this weekend to get time to work on the house again. And even then, it's only because the contractor and I had a misunderstanding about the date to get the bathroom started. he said the 'weekend after Thanksgiving,' which I took to be this weekend - the Saturday and Sunday after Thanksgiving. Happily, I called before starting demolition of the bathroom Friday and found out he meant the weekend after Thanksgiving weekend! No harm done, and I enjoyed a mostly relaxed weekend. I got the plaster and trim finished around the inside of the door tonight - I'll eventually paint everything, but other than being a little darker, the plaster is a good match in texture and the whole thing came out well. I bought a finishing kit from Lowe's that worked well and looks very nice. The wall was actually thicker than the standard doorframe and I had to shim it out some to get a good fit. |
|
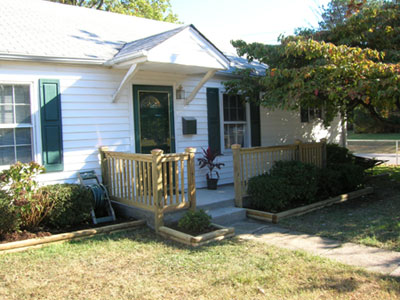
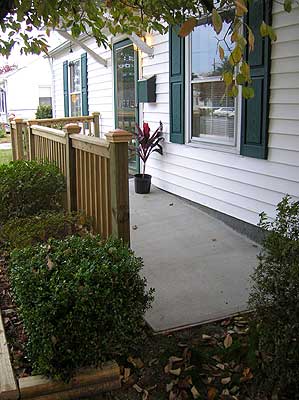
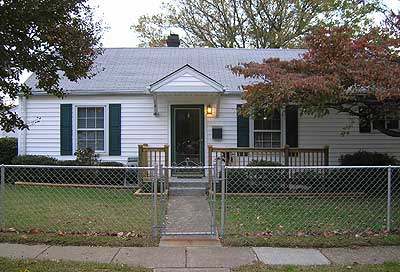
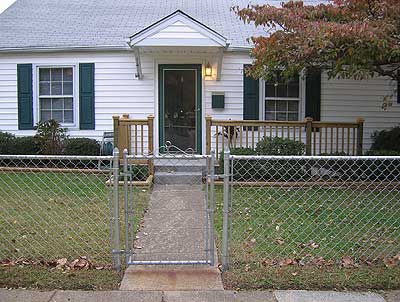
November 11, 2007 - I can finally let the rest of the story out on the porch - it's actually a full handicapped access ramp for my mom. I've been keeping it a surprise until she could see it. It's pretty well disguised by the level railing and the row of bushes in front of it. So well, in fact, that even when she and dad came over today to see the work on the house in person, I had to talk her into getting out of the car to take a closer look. The surprise was worth the wait, and she was able to come into my house for the first time in years. More work ahead this month - The awful master bathroom gets ripped out after Thanksgiving. It was ugly when I moved in 15 years ago and has not improved with the passage of time. I have a contractor coming to take out the window and replace the worn-out tub with a new walk-in shower. After that, I'll take care of the rest. New everything from floor to ceiling. |
|
|
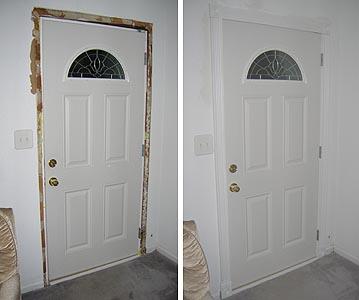
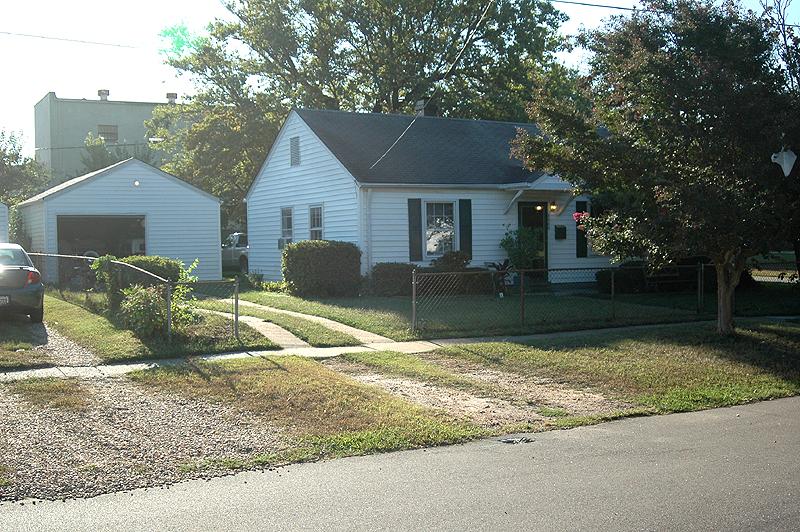
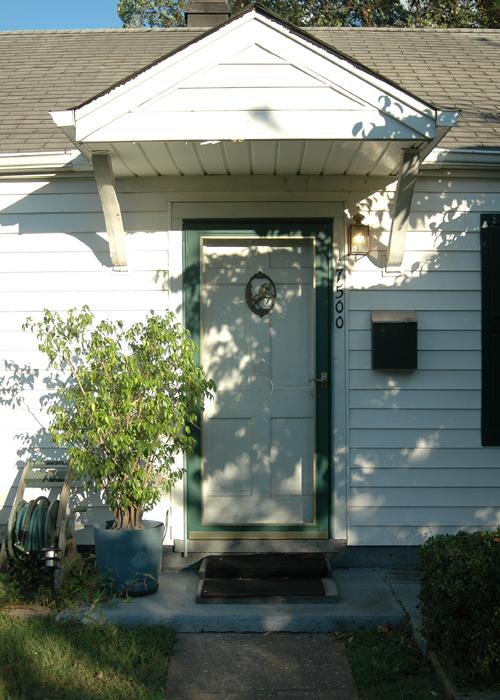
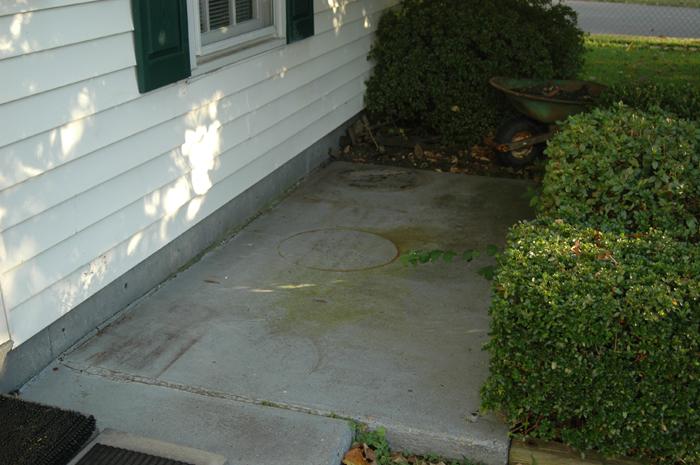
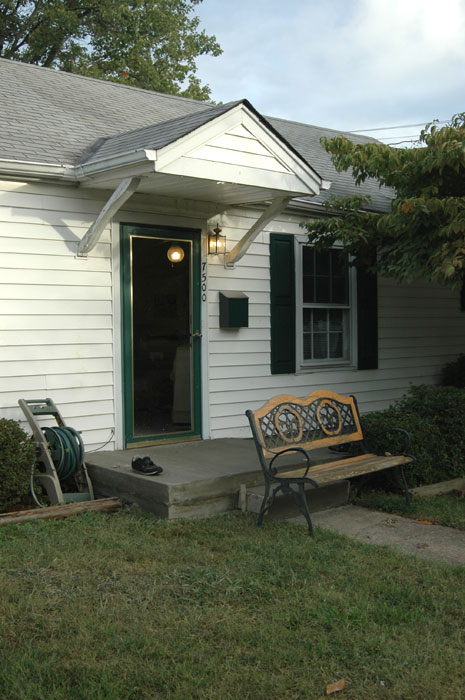
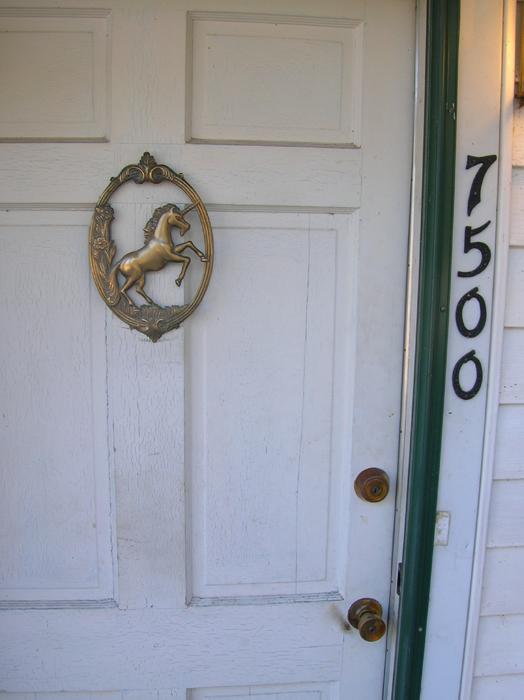
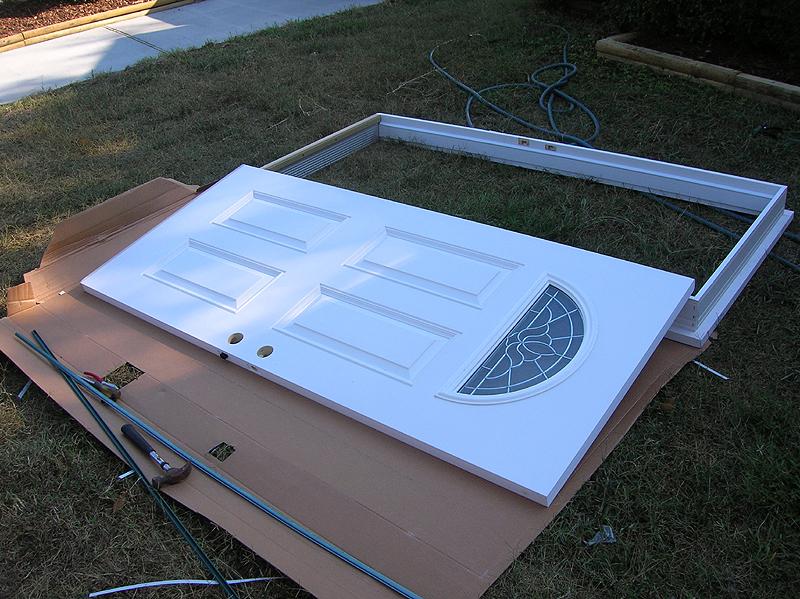
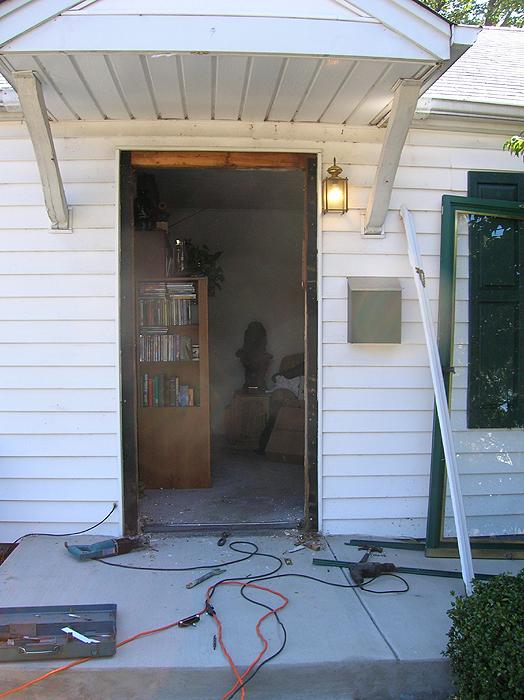
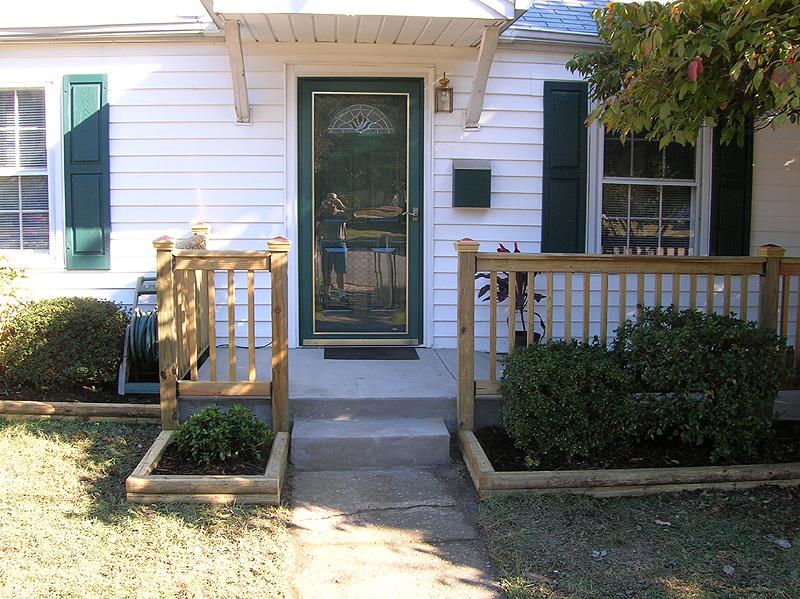
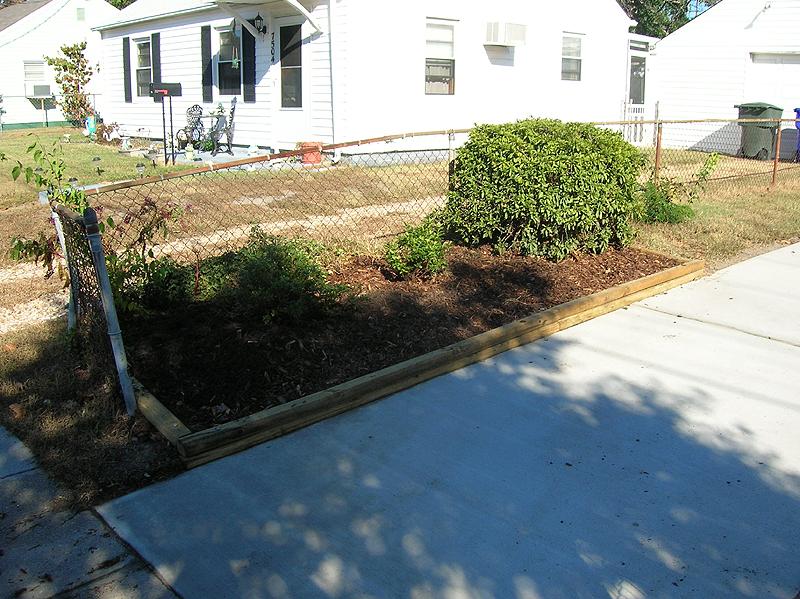
October 21, 2007 - I've been planning to do several modifications to the house for a long time. Like, ever since i moved into the house 15 years ago. The master bathroom was an ugly mess then, and it hasn't improved over the years. It's the only room I still haven't attacked, but in a few weeks it all gets ripped out and replaced. Other projects included a new front door, replacing the rusted front chain link fence, a new driveway with double parking pad in front of the garage, and a new porch with a railing. So, a few weeks ago I had a crew come out and rip out the old driveway and porch, and pour all new concrete. Since I had to pull down the fence for the concrete truck anyway, I went ahead and replaced replaced the fence and gate. The roof got pressure-washed to remove 20 years (at least) of stains. The, last weekend, I ripped out the front door and replaced it with a new one that I painted Hunter Green to match the rest of the trim. New hardware, of course, and though it took a couple of days, it came out OK. Yesterday I gathered supplies first thing in the morning and built the railing. The main posts are 4x4s sunk 3 feet in the ground, and everything is screwed together (including the railing uprights). Post caps with a copper point cover added just enough to dress it up a little. Today, I redid all the front flower beds with new landscape logs and mulch, making them deeper and adding a new small bed on the left of the porch step to balance things out. Some new azalea bushes helped fill out the driveway bed, also new. You can follow the progress in the photos below, start from the top left and working left to right and down. While it may not be up to professional standards, it's good enough to make me happy. And I've already had neighbors complaining that I'm making them look bad! |
|||||||||||||||||||||||||||||||||||||||||||||||||||||||||
|
|||||||||||||||||||||||||||||||||||||||||||||||||||||||||